How to set up multiple steam accounts for quick local family sharing
So you want to play yourself in a multiplayer game? If its an asynchronous online game, like chess - but the game disables local play, then you will need multiple steam accounts.
However, there is a way to make swapping around a fast and relatively painless process.
Considering the gaming audience, this guide is for Windows only. There may be similar techniques available for osx and/or linux - please make a merge request with your additions if you port this technique to another OS.
Step 1 - register some alts
First step is pretty obvious, you will want some steam accounts to family share with. Ideal number here is 5 extra accounts, as thats the max you can set on family share without having to reconfigure things or get locked out.
Just go to https://store.steampowered.com/join and register some accounts. You will also want to have your main account add each of them as a friend, for easier matchmaking.
Note: since these are new accounts with $0 spent on the marketplace, they cannot initiate adding friends - your main account must add them and the alt must accept.
Additionally, I recommend NOT setting up the steam app for authenticating your alt account. due to swapping accounts on a mobile phone being a major headache here.
Step 2 - Set up some local computer accounts
Now, to keep from the constant log out/log in cycle, we’re going to need some extra windows accounts - one per steam account. This will allow us to save the steam login on each account.
For this example, we’ll call them steamalt1, steamalt2, etc.
You will want to set up several local user accounts (don’t use microsoft accounts for this) - and a guide to do so on windows 10 can be found here: https://support.microsoft.com/en-us/help/4026923/windows-10-create-a-local-user-or-administrator-account
Notes:
- This does NOT need to be an administrator account
- The account MUST have a password - you can’t use a blank password. It doesn’t need to be a good one, if you are not worried about others using your computer.
Once you have all of these accounts created, you’re going to want to log into each one once - just to set up the profile, at which point you can log out of it.
Step 3 - Making it easy
Now, you COULD just save a steam login for each of those profiles, and swap windows users every time you wanted to change users. But thats very slow.
Instead, you can create a shortcut that lets you run steam as a different user.
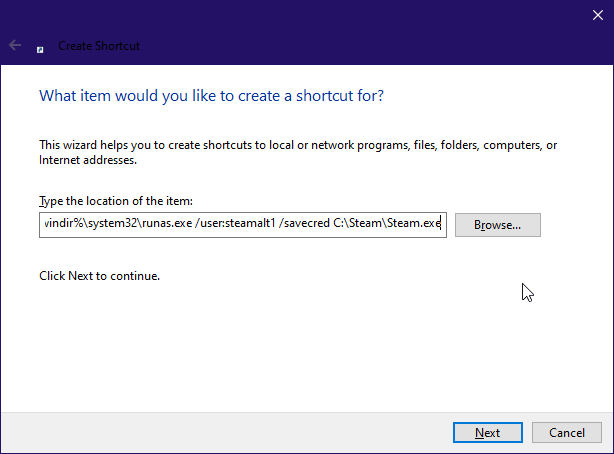
First off, create a shortcut. When it asks you for the location of the item, enter %windir%\system32\runas.exe /user:steamalt1 /savecred C:\Steam\Steam.exe

NOTE: This assumes you want to run as the WINDOWS user steamalt1, and you have steam installed in C:\Steam. If this is not accurate, change things accordingly.
Click next a few times until you end up with a shortcut. Now, make more, chaging steamalt1 each time to match your windows accounts.
Note: This only lets you run one copy of steam at a time. You MUST close steam before swapping to the next account in line.
Now with steam closed, double click on one of your shortcuts. It will ask you for the windows password for that user. Hit enter, and you should get a steam login window. Log in to your first alt, and click to save your login.
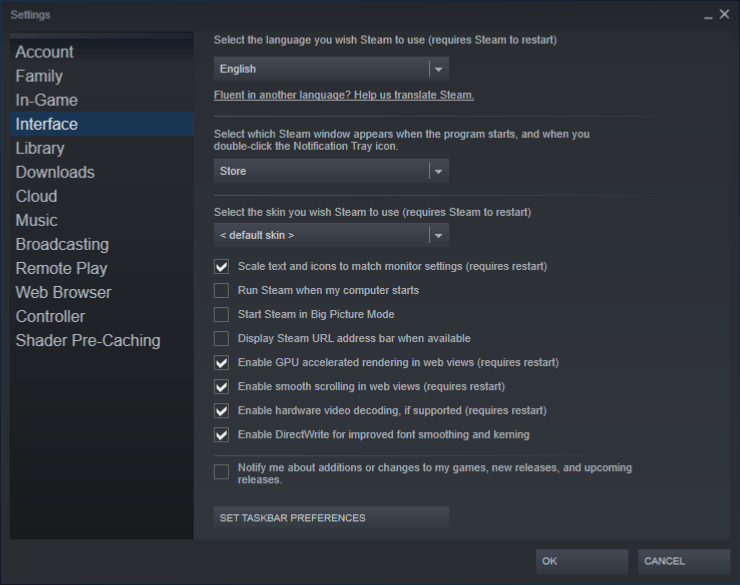
Once you’re logged in - I recommend going into your steam settings for this alt and unchecking the “Notify me about additions or changes to my games” checkbox under Interface. It just leaves you with one less popup every time you swap accounts.

Then, exit steam, and go to the next shortcut. Repeat until all your accounts are set.
Now your normal steam link will launch steam.exe as your main account - and you can close steam.exe and launch any of your alts to spin up the game. This is a great technique for cheezing asynchronous offline games, adding enough people to a guild, or other tasks that require multiple steam accounts that don’t need to be logged in at the same time. And this lets you easily handle 6 convinient alts per game you purchase.